Applies to:
- Revu 21
- Revu 20
- Revu 2019
- Revu 2018
Jump to other versions:
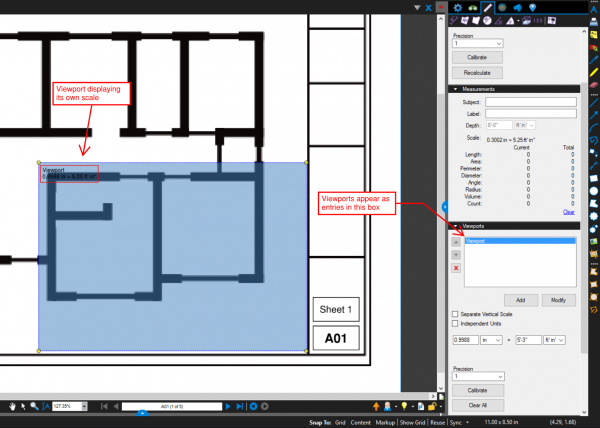
Revu allows you to create viewports, which are areas with different measurement scales than the rest of the PDF. All measurement markups you add within these viewports will adhere to that viewport’s specific scaling.
To create viewports:
- In the
 Measurements panel, select the
 Add Viewport button to define a viewport.
- Select OK in the pop-up window, and click and drag to define the region for the new viewport.
- Enter a label for the viewport, and select from either the preset scales or set your own custom scale.
- Select Apply.
To change the name and/or scale of a viewport, select the menu icon ![]() for the desired viewport.
for the desired viewport.
To delete a viewport, select the viewport and click theDelete Viewport button. To delete all viewports from either the page or the entire document, select the
Clear All Viewports button.
How-To
Revu 2018
Revu 2019
Measurement
Revu 20
Revu 21
Other versions of this article
Revu 2017 and older
The Viewports section of the Measurement tab allows you to create viewports with various scalar calibrations. This allows you to define different areas (via the viewports) which each have different effective scales, and all measurement markups drawn within these viewports will adhere to that viewport’s specific scaling.
- In the View menu, hover over Tabs, then click Measurements. Or use keyboard shortcut Alt+U.
- In the Viewports section, click the Add button to define a viewport.
- Click OK on the pop-up window, and click and drag to draw out a rectangle on the PDF to define the area for the new viewport.
- Type a name for the viewport, then click OK.
- Click the Calibrate button in the Viewports section of the Measurement tab to calibrate a new scale for the viewport, or manually enter the values for the new scale directly into the Viewports section of the tab.
- Select a viewport in the list and then click the red X button to delete a viewport. Click the Clear All button to delete all of the existing viewports (Only in version 8 and above).
The existence of extra viewports may adversely affect measurement markups. For example, if you’re drawing a Length measurement in “feet and inches,” but the annotation appears in decimal format, then it’s quite possible there are existing viewports in the PDF which are affecting the measurement.
If you’re using Revu 11 or above, you can find out more information about unwanted viewports and removing them in Page Turns Blue When Doing Measurements, while users of Revu 10 and lower should take a look at Unable to Calibrate a Document.
Please checkout our video tutorials on PDF Measurement , the Measurement Enhancements in Revu 12 , and Takeoffs and Estimations , in addition to the FAQ section on our Support page, and the Revu Help Guide.
How-To
Revu 2017 & Below
Measurement

