Markups List
The Markups list automatically tracks markups placed on a PDF, including author, date, color, and comments associated with each markup.
The Markups list toolbar contains tools for organizing, processing, importing, and exporting data.

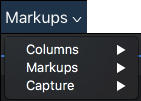
Markups menu:

Columns: Selects which columns are shown in the Markups list.
 Import: Takes the markups from a PDF or BAXThe BAX format is a Bluebeam-specific XML file. BAX files have the advantage of being able to be imported automatically by double-clicking them. If necessary, the .bax extension can be manually renamed to .xml to convert the file to a normal XML file. file and includes them in the active PDF (this is useful for incorporating and reviewing markups or feedback from multiple sources).
Export: Exports all markups to a BAXThe BAX format is a Bluebeam-specific XML file. BAX files have the advantage of being able to be imported automatically by double-clicking them. If necessary, the .bax extension can be manually renamed to .xml to convert the file to a normal XML file. file. The BAX file can be imported into another PDF so that the markups will be shown in the target PDF. The BAX file can also be imported into Excel.
 Summary: Publishes a summary report of all the markups in a PDF. A PDF Summary can be saved as a separate PDF or appended to the end of the current PDF. It is also possible to export a Summary as CSV or XML data for use in Excel or other programs.
Capture Summary: Publishes a summary report of Capture media.
 Filter: Toggles column filters on and off. To clear filters, click the down arrow to its right and select Clear All.
 Hide Markups: Turns on Hide Markups mode, hiding all markups in the current PDF file. Markups will not be shown or printed when this mode is enabled. Click again to exit Hide Markups mode. This mode is temporary and will be reset the next time Revu is started.
 Search: Filters the Markups list based on the text entered in the field.
The Markups list is formatted as a table with each row representing a markup that has been added to the active PDF and each columns showing a particular piece of information about the markup.
As a row is selected, the view of the PDF in the workspace will jump to the location of the associated markup. This makes it easy to use the Markups list to step through the markups in PDF using the UP ARROW and DOWN ARROW keys.
To sort by any column, click the desired column header. Click again to reverse the sort order. When markups are sorted by column, they are collected under section headings found in the Subject column. Each section has a toggle triangle; click it to expand or collapse the section.
The following examples show an expanded, collapsed, and partially collapsed list sorted by Page number:
Expanded List

Collapsed List

Partially Collapsed List

The columns shown in the Markups list is highly customizable. Toggle various columns on and off by selecting them from the Markups List > Columns menu. The list reveals currently available columns: checked columns are currently shown in the Markups list and unchecked columns are hidden. Data is still stored for hidden columns and columns can be hidden or shown at any time. Simply select a column from this menu to hide or show it.
The available built-in columns are:
Subject: Shows both an icon and text that indicate the type of markup used on the PDF. This text can be changed in the Subject field in the Properties panel, or by double-clicking on the Subject text in the Markups list.
Page Label: Shows the page of the PDF on which the markup is located.
Page Index: Shows a numeric value indicating on which page the markup or measurement resides. Page Index is a useful column to use for sorting when exporting to spreadsheet programs.
Lock: Shows whether the markup is locked for editing or not. If locked, a
Status: Shows the current status of the markup. To set a status, select the markup and use the  Status menu in the column header or right-click the markup and go to Set Status to select it.
Checkmark: A simple checkbox that enables the Markups list to be used as a basic checklist. Click to toggle a checkmark on or off.
Author: Indicates the person (identified by username) who created the markup. Double-click this field to edit an author's name.
Date: Shows the date and time the markup was last modified, based on the system time.
Creation Date: Shows the date and time the markup was created, based on the system time.
Color: Shows the line color used for the markup.
X and Y: Shows the coordinates on the PDF page where the markup is located, counted from the lower left.
Document Width and Document Height: Shows the size of the markup on the PDF.
Comments: Shows the comments from the General section of the Properties tab for this markup. Double-click in this field to change the comment associated with the markup.
Wall Area: Shows the total Wall Area for Area or Perimeter markups.
Length, Area, Volume, Count and Measurement: Each shows values associated with Measurement markups.
Label: Shows the label associated with the markup. The label can be changed in the General section of the Properties tab. For measurement markups, it is common to use the Label field to specify the type of material that's being measured, such as "Tile 1" or "Carpet 3."
Sequence: Records the numerical value associated with a Sequence markup.
Capture: Shows whether a markup has embedded images or videos. If embedded images or videos are present, a ![]() appears in this column; double-click this icon to preview the embedded media.
appears in this column; double-click this icon to preview the embedded media.
Depth: Shows the depth of the markup on the PDF.
Rise/Drop: Shows the length of the rise or drop defined for the Polylength or Perimeter measurement.
Slope: Shows the slope ratio of an Area or Length.
Layer: Shows the layer that contains the markup.
Height and Width: Shows the actual height and width of the element represented by the markup on the PDF.
Space: Shows the Space that contains the markup.

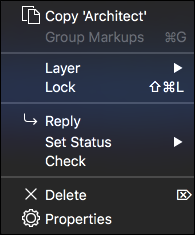
 Copy stores the contents of the specific cell that was
Layer is used to assign a markup to a layer on the PDF. If a markup that is associated with a layer is flattened, it is automatically flattened on that layer.
Lock prevents users from altering the markup on the PDF. Certain changes to the Markups list for the markup can still be made, however (changing the Status or entering a Reply, for example).
 Reply: Replies to the selected markup. Replies appear on a new indented row below the markup in question.
Set Status: Sets the status of the markups. The Review statuses are Accepted, Rejected, Completed, Cancelled and None.
Check: Checks or unchecks the checkbox associated with the selected markup. Also provides a command to clear all checkboxes.
 Delete: Deletes a selected reply from the Markups list or a selected markup from both the PDF and the list.
 Properties: Opens the Properties panel for the markup.